Pages

Tuesday, June 29, 2010

Teaching Tuesday

Teaching Tuesday!


Teaching is like therapy for me.  I love being in the classroom (hence the reason I am returning this fall).  However teaching isn't just about delivery information to someone.  It is about the relationship you build as you help someone learn a new process, skill or knowledge set.  There are so many things about teaching I love.  I am going to use this feature to TEACH you a little about what I love...Family Farms...
(My sister, cousin, & I at my Grandparents farm in GA with my Granddaddy.)

Agriculture is what my life thrives on....I love the fact that my husband is a full time farmer.  We raise sheep, beef cattle and dairy cattle plus we have a few horses.  Let me clarify...because for many out there you might think we have a few head of each.  We raise about 50 head of sheep, 300 head of beef cattle and milk 115 head of dairy cattle.  We are a family farm and proud to say that we are American Farmers. 

America's farmers are the world's most productive. Today, each U.S. farmer produces food and fiber for 155 people in the United States and abroad.  That's a lot of production for a small percentage of the population. 

The number one question I get when I talk about farms is aren't all farms factory farms now??  And the answer is NO NO NO!!! I am not a factory farmer and neither are the majority of farms in the U.S.  You might view us as a corporation because due to taxes and liability we are Nance Farms, LLC, but we are family owned and operated just as most American farms are! Today 98 percent of all U.S. farms are owned by individuals, family partnerships or family corporations. Just 2 percent of America's farms and ranches are owned by non-family corporations.

These two simple facts are the two most important facts farmers and their families need American Consumers to know.    I realize that many times in the media we (Farmers) are betrayed as the bad people, we use chemicals on our crops and antibiotics for our animals. 

 And yes we use fertilizers on our fields to help our land produce better crops, however we also leave behind plant matter to decay to improve our soils and no longer have the erosion issues of a generation ago. 

And yes if we have a sick animal they receive antibiotics just as you do if you go to the doctor.  Healthy animals produce faster, better, and more meat and milk for consumers. 


We are teaching the next generation to grow up and become stewards of the land and environment.  We spend our days working and our nights researching the last news about our industry.  I can't believe how many people don't realize that to be an American farmer you must have:

 
Faith in God, confident, and a desire.  I hope you all have learned a little about Family Farms in America.  If you have any questions please feel free to ask! 

Monday, June 28, 2010

Monday Munchies

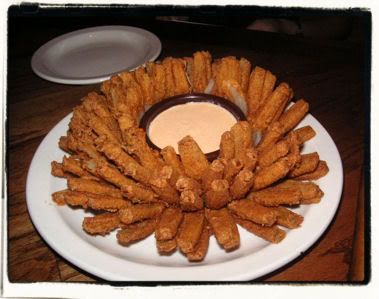
bloomin-onion.jpg image by phoebebuffay328
To kickoff our new feature I thought I would share with you one of my all time favorite appetizers.  Let me preface it by saying I grew up in Georgia, not far from a little town famous for a particular vegatable...some of you might have heard of Vidalia onions...they are the sweetest most decilious onions in the world.  I can eat them like an apple everyday of the year (granted my husband probably wouldn't want to kiss me but they are worth it....maybe not).  The recipe is simple enough to make during the week for a quick appetizer, but great for parties.

Bloomin' Onion

Ingreditents for batter
1/3 cup cornstarch
1 1/2 cup flour
2 teaspoon mince garlic (fresh works best)
2 teaspoon paprika
1 teaspoon salt
1 teaspoon pepper 
1 (24 oz) can of beer (choose one you don't mind drinking)
4 Vidalia onions

Ingredients for seasoned flour mixture
2 cups of flour
4 teaspoon paprika
2 teaspoon garlic powder
1/2 teaspoon pepper
1/4 teaspoon of cayenne

Directions
1. Mix cornstarch, flour and seasonings until well blended
2. add beer, mix well, (don't drink too much)
3. cut about 3/4" off the top of the onion and peel.
4. Cut onion into 12-16 vertical wedges DO NOT CUT ALL THE WAY THROUGH!!!
5. remove about 1" of petals from the center of the onion
6. separate petals to coat thoroughly with batter

7. mix all ingredients for the seasoned flour mixture together
8. dip the onion into the seasoned flour mixture and remove excess by shaking
9. gently place in fryer basket and deep-fry at 375-400 degrees for 1 -1 1/2 minutes
10. Flip over and fry an additional 1 1/2 minutes or longer until golden brown.
11. Drain on paper towels.  
12. Place onion upright in shallow bowl and remove center core wiht circular cutter or apple corer.
13. Serve with dipping sauce of choice. (below is the recipe for my dipping sauce).


Chili Sauce:

1 cup mayonnaise
3 tablespoons chili sauce
1 teaspoon chili powder
1/8 teaspoon cayenne pepper


Saturday, June 26, 2010

Blog Redo...Take 2

For a while now I have been talking  about how to change up my blog(s).  Do I want to combine them?  What should I talk about?  You know the deal.  Last night while laying in bed...attempting to sleep in 90 degree weather I came up with a plan.  I won't blog each day of the week however 5 out of 7 days is my goal.  And no I won't be combining the 2 blogs.  I have assigned a title to each day I have chosen to blog on so that I have a guide on what to blog about.

HSM Blog Schedule
Monday Munchies-

      Mondays will be geared toward sharing recipes, also snacks, meal planning etc.

Teaching Tuesday-
      Tuesdays will be used to teach...it could be a sewing tutorial, a classroom lesson, a WIC lesson and much much more..

Wear it Wednesday-

        Wednesdays will be devoted to clothing.  Clothing that I have made...what you have made...what my son is or isn't wearing that week, my weekly wardrobe...maybe even a few good deals

Farm Friday-

         Fridays will be giving you a glimpse of the farm life.  Since this is such a major part of my life I would like to share the experience with each of you. 

Sewing Showcase Saturday-

          Saturdays will be my link party.  Showcasing all of your sewing creations for the week. 

I am excited that I have finally discovered a setup that will work for me.   We will begin our new venture on Monday!  So check back I can't wait!


Thursday, June 24, 2010

Ummm...what about that sew through a book thing???

So I just realized that I was suppose to start a new blogging series LAST WEEK!!!  My plan was to sew through a semi-newly released book and discuss the pros and cons...Well two things have hindered that process...

1) I checked out 15 semi new sewing books from the library and could decide on which book to choose.  I had narrowed it down to 3 and still could make a final decision....Who Wants to be a Millionare would not be a good game for me (I take a REALLY REALLY long time to decide anything). 

2) 2 of the 3 books had patterns that needed to be used to construct the items...well I could have made copies on the plotter at work but not everyone has that access plus I really prefer to cut up my orginals and use them (I know, I know...don't lecture me about the irrationality of that statement). 

So what am I going to do instead??? I am not really sure (SHOCKING, LOL).  I have a few ideas but still trying to determine what would be best.  I do have some projects from the 3 books that didn't require patterns so I plan to make those for you...and discuss the pros and cons...the book idea is coming just not yet...

In other news I am heading to Washington, D.C. in July and need some advice.  I have a limited amount of site seeing time...have you been to D.C....what was the best sites...anything CAN'T miss???  I will be in a workshop most days from 8:30 until 5.  But hopefully I will be more prepared to discuss the agriculture way of life with you after this training...

I hope you enjoyed the random pictures...

BTW...what are you interested in hearing about...my sewing adventures and misadventures...pattern reviews...farm life...mom life...all of the above???  Leave some comment love...Thanks!

Sunday, June 13, 2010

Trimmed with love contest!


So I had BIG BIG plans on what to do for the Trimmed w/ Love contest Melissa was having and as usual my plans crumpled like a bad term paper.  With VBS beginning tomorrow, the in-laws heading out of town for a week, work, birthday parties, playdates, and my domestic duties I ran out of time to create a new and amazing craft.  So I entered two of the projects I finished this week.  They aren't my best work but they are nice.  One was the Lil Blue Boo dress I made for a cousin's daughter and the other was my book cover.  Both were made for a special reason.  So even if I don't win (or even place) it will be ok.  BTW after looking at all the other entries I don't think I will be winning this contest.  Ok so head over to Melissa's page and look at all the wonderful entries.  I hope everyone has a very blessed week!


Friday, June 11, 2010

Lil Blue Boo

On Monday I purchased a Lil Blue Boo Sienna Dress Pattern.  I finished up my first dress with the pattern today!  It is too cute.  I used tee shirts to make the dress.  Now its not as orignal as it could be but I have never had luck working with knit material.  The pattern was simple and easy to use and had great tips for sewing knits on a regular sewing machine.  This is going to be Phoebe's birthday present...hopefully she likes it! 


linking up @


Photobucket

Thrifty Thursday!

Wow just let me tell you I am not that much of a Thrifty gal!  I've tired hard...i mean really hard...clipping coupons, shopping thrift stores, searching for the best deals online, etc.  But yesterday I hit it!  I finally felt like I was a thrifty gal!  I was out scouting for t-shirts to cut up and make into dresses.  At the thrift store I couldn't find a single t-shirt they didn't want $1.50 for!!!  I was outraged these are used t-shirts I can find them cheaper new!  So on the way out the door something caught my eye...a little boy's blazer!  It was a Children's Place Blue Seersucker blazer...brand new...still had the TAGS!!  And they were only asking $5.  I didn't even try to baragin with them!  I was too cute...here are a pic of the little man modeling this great find!
I realize that its a little short and he is wearing a pullup and mud boots but still cute!!  (Please excuse the mess).


Thursday, June 10, 2010

Blog Design Giveaway!

Life in the Pitts is giving away a very special gift for some blogging person out there!
L.I.T.P. is giving away a blog design packaged valued at $70 from 733...A Creative Blog! 
Go over and check it out!

Wednesday, June 9, 2010

Book Cover Tute

I recently purchased a new Bible.  This is an ESV Study Bible.  I LOVE LOVE it.  It is great for really digging into God's word and growing in your faith.  OK I know that you aren't here for a book review! 

The only problem I had with this book was that the version I could afford was not very attractive.  It was blaring white, red and black!

See what I mean...its not very pretty.  I wanted to make it pretty.  It was very simple and a great beginner project.  I will apologize for the lack/quality of pictures now.  I will try to update this tute tonight!

Materials:
1 fat quarter of fabric
fabric scraps
thread
sewing machine
scissors
iron
pressing board

Step 1:
Measure the book you wish to cover.

You should measure the face of the book width and length(mine measured 6.75 inches wide x 9.5 inches long)


You should measure the thickness of the book (mine was 2.5 inches)

Step 2:
Figure your fabric needs. 
I needed two strips of fabric that was 14.5 inches wide by 10 inches high (cut from the fat quarter)
I also needed 1 strip of fabric that was 3 inches wide by 10 inches high (cut from scraps)

Step 3:
Press all raw edges 1/4 inch to the wrong side of the fabric.  Once all edges have been pressed stitch those raw edges down.

Step 4:
All of your edges have been finished. 
We need to join together the 3 pieces. 
Place one of your large strips (14.5 x 10) right side up on the table. 
Now place your small strip (3 x 10) face down on top of the large strip. 
Joining your 10 inch sides together
You should have two pieces of fabric right sides together, pin. 
Sew them together with a 1/4 inch seam allowance. 
I back stitched at the beginning and end of mine
since this is a book that will be used a lot and I wanted it to be sturdy.   
Press your seam allowance to one side. 
Place your joined pieces face up on the table
 and place your 2nd large piece of fabric face down, pin. 
Join pieces together using a 1/4 inch seam.
Again I back stitched at the beginning and end.
Press seam to one side.

Step 5:
Now decide if you want any embellishments. 
I wanted a ruffle, because ruffles are KEWL!!!
I cut a strip of my scraps 3 inches wide and 15 inches long. 
You could finished the raw edges but I decided to leave them ragged.
Loosen your tension on your machine and lengthen your straight stitch.
On my machine I turn my tension to 2 and have a stitch length of 5.0.
Sew two parallel stitches on the strip 1 inch apart.
DO NOT back stitch at the beginning and end.
Be sure to leave your threads long.
Once you have your two parallel lines,
pull the gathering thread until you have a ruffle the size of your book face.
RESET YOUR TENSION AND STITCH LENGTH!

Step 6:
Measure your ruffle to ensure correct size. 
Take a coordinating scrap of fabric that is slightly longer than the length of your ruffle
and 5 inches wide.
Fold your strip in half (wrong sides together)...press
Open up and press the raw edges to the middle.
Fold in half again and press.
You should now have a strip of fabric that is the length of your ruffle and a little over 1 inch wide.
Top stitch all edges closed.

Step 7:
Place your finished strip on the center of the ruffle. 
 Top stitch the strip to the ruffle.

Step 8:
Now its time to attach our embellishment to our cover. 
Place the cover wrong side down on the table.
Place your book onto the fabric.
Open the back cover of the book
fold the fabric into the cover pin top and bottom edges
mark the fabric with a pin where the fold occurs.
Do the same for the front cover of the book.
With the cover still on the book and pinned
place the ruffle or other embellishment on the front.
Choose your location and pin to the front cover.
Now remove the book from the cover.
Unpin the top and bottom edges on the front of book cover
Your front cover should now be free.
I placed my pins back into the fabric just to mark where i need to join the pieces.
Top stitch the ruffle to the front cover ensuring not to sew through the inside fabric flap.

Step 9:
Now we are almost done!  You can finish one of two ways!

Option 1: top stitch  the bottom and top edges of the fabric together.
 Using the pins as a guideline for the book size.

Option 2: Using the pin that marks the fold as a guide
fold the inside flap of the cover out onto the front of the cover so that right sides are together
Stitch the top and bottom edges closed
flip the pocket you just created open so that the wrong sides are together
repeat with the back cover.
this will hide your edges.

Step 10:
Slide your book into the cover!  TaDA! Your done! 


Now you have a pretty book!
Enjoy! 
Linking up @


Fine Craft Guild


Get your craft on Thurs.

giveaways

HookingupwithHoH


NightOwlCrafting


Monday, June 7, 2010

Awesome Giveway! Check it out NOW!!!

There is an awesome giveaway going on over at Ruffle Butts!  Are you ready for this?? Three of the most awesome baby brands are teaming up for the ultimate giveaway, an adorable outfit from head to toe! One winner will receive all of these fabulous goodies, valued at over $150!  I can't believe they are giving away such a SWEET package!!! Here are the goodies:

- A White RuffleButts Ruffled Swing Top & coordinating Heart Ruffles RuffleButt Bloomer in the size of your choice ($50 value)

- Baby Banz sunglasses in the size and color of your choice, with a cool protective case ($27.50 value)

- A super cute Baby Banz sun hat and they're even throwing in some sunscreen to keep your little one extra safe ($27.50 value)

- And to top off the outfit, a pair of Bobux shoes in the style and size of your choice! (up to $48 value)

Contest ends on 6/14 so hurry up and check this great giveaway out!!!


Friday, June 4, 2010

Participating in my first Sew & Tell Friday!

This week has been very productive for me.  I have finished a few projects that I have been working on plus created these two custom dresses for a co-worker's daughter. 


These dresses are quick and easy to make.  I use the Froglegs and Pony Tails pattern for the Caroline Dress.  My favorite part is selecting the fabrics!  I can spend hours upon hours searching for just the right TWO!  I can't wait to see little Clara in these two darling dresses. 

Next week I will be sewing graduation gifts and father day's items.  I am excited to begin sharing more of what I sew!  So check back often to see what I am sewing!