Pages

Showing posts with label sewing. Show all posts

Monday, January 17, 2011

Laptop Cover

A few months back I got a new laptop...
mainly because my old one was destroyed by a little man.
I didn't have a cover of the laptop
but didn't want to purchase a plain ol' black one.

So what does a crafty lady do???
MAKE HER OWN!!

Now this is not a tutorial by any means...
just a little bit on how i created my cover!

First I measured the width, length and depth of the laptop...
decided I would use some scraps I had from Wyatt's quilt
pieced them together
ironed a piece of fusible fleece to the back...
attached a piece of knit fabric (Rst)
and then stitched 3 sides together
flipped it right side out
covered the raw edge with some cute binding
folded right sides together
stitched the bottom edge and one long side
inverted and
shzam!!! a new laptop cover!

Again not the hardest project in the book
but definitely a cute one!!


Happy Sewing!

Linking up @


Photobucket


The Trendy Treehouse


Keeping It Simple


Saturday, January 15, 2011

Nice Washcloths for Young Kiddos

Apparently we have mean washcloths at our home...
now i am not exactly sure what a "mean" cloth is but
that is the word my son uses to describe our washcloths.

Luckily Becky from Becky Ann Designs
helped to solve the mean washcloth problem.
Becky gave Wyatt two flannel washclothes and soap
she made for Christmas.
Below is one of the two...

I sent her a message on FB to find out exactly what she did,
since i didn't want my little man going around telling everyone
about our extremely mean washcloths.

I was amazed by the simple nature of these washcloths
and wondered why I had made these before...
umm...I thought I was crafty!

Well yesterday (snow day 4) Wyatt and I sat down 
to make a bunch so he didn't have to suffer anymore!
He helped me pick out the fabrics 
attempted to help cut with his John Deere pilers
and then sat on my lap as we stitched them together.


We now have an even dozen NICE washcloths.
This would make a great beginner project for someone interested
in getting started sewing...
I will post a tutorial soon...
really its easy peasy!!

Please forgive the photo quality...my digital is broken..won't charge AT ALL
and these were taken with my camera photo!

Saturday, June 26, 2010

Blog Redo...Take 2

For a while now I have been talking  about how to change up my blog(s).  Do I want to combine them?  What should I talk about?  You know the deal.  Last night while laying in bed...attempting to sleep in 90 degree weather I came up with a plan.  I won't blog each day of the week however 5 out of 7 days is my goal.  And no I won't be combining the 2 blogs.  I have assigned a title to each day I have chosen to blog on so that I have a guide on what to blog about.

HSM Blog Schedule
Monday Munchies-

      Mondays will be geared toward sharing recipes, also snacks, meal planning etc.

Teaching Tuesday-
      Tuesdays will be used to teach...it could be a sewing tutorial, a classroom lesson, a WIC lesson and much much more..

Wear it Wednesday-

        Wednesdays will be devoted to clothing.  Clothing that I have made...what you have made...what my son is or isn't wearing that week, my weekly wardrobe...maybe even a few good deals

Farm Friday-

         Fridays will be giving you a glimpse of the farm life.  Since this is such a major part of my life I would like to share the experience with each of you. 

Sewing Showcase Saturday-

          Saturdays will be my link party.  Showcasing all of your sewing creations for the week. 

I am excited that I have finally discovered a setup that will work for me.   We will begin our new venture on Monday!  So check back I can't wait!


Thursday, June 24, 2010

Ummm...what about that sew through a book thing???

So I just realized that I was suppose to start a new blogging series LAST WEEK!!!  My plan was to sew through a semi-newly released book and discuss the pros and cons...Well two things have hindered that process...

1) I checked out 15 semi new sewing books from the library and could decide on which book to choose.  I had narrowed it down to 3 and still could make a final decision....Who Wants to be a Millionare would not be a good game for me (I take a REALLY REALLY long time to decide anything). 

2) 2 of the 3 books had patterns that needed to be used to construct the items...well I could have made copies on the plotter at work but not everyone has that access plus I really prefer to cut up my orginals and use them (I know, I know...don't lecture me about the irrationality of that statement). 

So what am I going to do instead??? I am not really sure (SHOCKING, LOL).  I have a few ideas but still trying to determine what would be best.  I do have some projects from the 3 books that didn't require patterns so I plan to make those for you...and discuss the pros and cons...the book idea is coming just not yet...

In other news I am heading to Washington, D.C. in July and need some advice.  I have a limited amount of site seeing time...have you been to D.C....what was the best sites...anything CAN'T miss???  I will be in a workshop most days from 8:30 until 5.  But hopefully I will be more prepared to discuss the agriculture way of life with you after this training...

I hope you enjoyed the random pictures...

BTW...what are you interested in hearing about...my sewing adventures and misadventures...pattern reviews...farm life...mom life...all of the above???  Leave some comment love...Thanks!

Friday, June 11, 2010

Lil Blue Boo

On Monday I purchased a Lil Blue Boo Sienna Dress Pattern.  I finished up my first dress with the pattern today!  It is too cute.  I used tee shirts to make the dress.  Now its not as orignal as it could be but I have never had luck working with knit material.  The pattern was simple and easy to use and had great tips for sewing knits on a regular sewing machine.  This is going to be Phoebe's birthday present...hopefully she likes it! 


linking up @


Photobucket

Wednesday, June 9, 2010

Book Cover Tute

I recently purchased a new Bible.  This is an ESV Study Bible.  I LOVE LOVE it.  It is great for really digging into God's word and growing in your faith.  OK I know that you aren't here for a book review! 

The only problem I had with this book was that the version I could afford was not very attractive.  It was blaring white, red and black!

See what I mean...its not very pretty.  I wanted to make it pretty.  It was very simple and a great beginner project.  I will apologize for the lack/quality of pictures now.  I will try to update this tute tonight!

Materials:
1 fat quarter of fabric
fabric scraps
thread
sewing machine
scissors
iron
pressing board

Step 1:
Measure the book you wish to cover.

You should measure the face of the book width and length(mine measured 6.75 inches wide x 9.5 inches long)


You should measure the thickness of the book (mine was 2.5 inches)

Step 2:
Figure your fabric needs. 
I needed two strips of fabric that was 14.5 inches wide by 10 inches high (cut from the fat quarter)
I also needed 1 strip of fabric that was 3 inches wide by 10 inches high (cut from scraps)

Step 3:
Press all raw edges 1/4 inch to the wrong side of the fabric.  Once all edges have been pressed stitch those raw edges down.

Step 4:
All of your edges have been finished. 
We need to join together the 3 pieces. 
Place one of your large strips (14.5 x 10) right side up on the table. 
Now place your small strip (3 x 10) face down on top of the large strip. 
Joining your 10 inch sides together
You should have two pieces of fabric right sides together, pin. 
Sew them together with a 1/4 inch seam allowance. 
I back stitched at the beginning and end of mine
since this is a book that will be used a lot and I wanted it to be sturdy.   
Press your seam allowance to one side. 
Place your joined pieces face up on the table
 and place your 2nd large piece of fabric face down, pin. 
Join pieces together using a 1/4 inch seam.
Again I back stitched at the beginning and end.
Press seam to one side.

Step 5:
Now decide if you want any embellishments. 
I wanted a ruffle, because ruffles are KEWL!!!
I cut a strip of my scraps 3 inches wide and 15 inches long. 
You could finished the raw edges but I decided to leave them ragged.
Loosen your tension on your machine and lengthen your straight stitch.
On my machine I turn my tension to 2 and have a stitch length of 5.0.
Sew two parallel stitches on the strip 1 inch apart.
DO NOT back stitch at the beginning and end.
Be sure to leave your threads long.
Once you have your two parallel lines,
pull the gathering thread until you have a ruffle the size of your book face.
RESET YOUR TENSION AND STITCH LENGTH!

Step 6:
Measure your ruffle to ensure correct size. 
Take a coordinating scrap of fabric that is slightly longer than the length of your ruffle
and 5 inches wide.
Fold your strip in half (wrong sides together)...press
Open up and press the raw edges to the middle.
Fold in half again and press.
You should now have a strip of fabric that is the length of your ruffle and a little over 1 inch wide.
Top stitch all edges closed.

Step 7:
Place your finished strip on the center of the ruffle. 
 Top stitch the strip to the ruffle.

Step 8:
Now its time to attach our embellishment to our cover. 
Place the cover wrong side down on the table.
Place your book onto the fabric.
Open the back cover of the book
fold the fabric into the cover pin top and bottom edges
mark the fabric with a pin where the fold occurs.
Do the same for the front cover of the book.
With the cover still on the book and pinned
place the ruffle or other embellishment on the front.
Choose your location and pin to the front cover.
Now remove the book from the cover.
Unpin the top and bottom edges on the front of book cover
Your front cover should now be free.
I placed my pins back into the fabric just to mark where i need to join the pieces.
Top stitch the ruffle to the front cover ensuring not to sew through the inside fabric flap.

Step 9:
Now we are almost done!  You can finish one of two ways!

Option 1: top stitch  the bottom and top edges of the fabric together.
 Using the pins as a guideline for the book size.

Option 2: Using the pin that marks the fold as a guide
fold the inside flap of the cover out onto the front of the cover so that right sides are together
Stitch the top and bottom edges closed
flip the pocket you just created open so that the wrong sides are together
repeat with the back cover.
this will hide your edges.

Step 10:
Slide your book into the cover!  TaDA! Your done! 


Now you have a pretty book!
Enjoy! 
Linking up @


Fine Craft Guild


Get your craft on Thurs.

giveaways

HookingupwithHoH


NightOwlCrafting


Friday, June 4, 2010

Participating in my first Sew & Tell Friday!

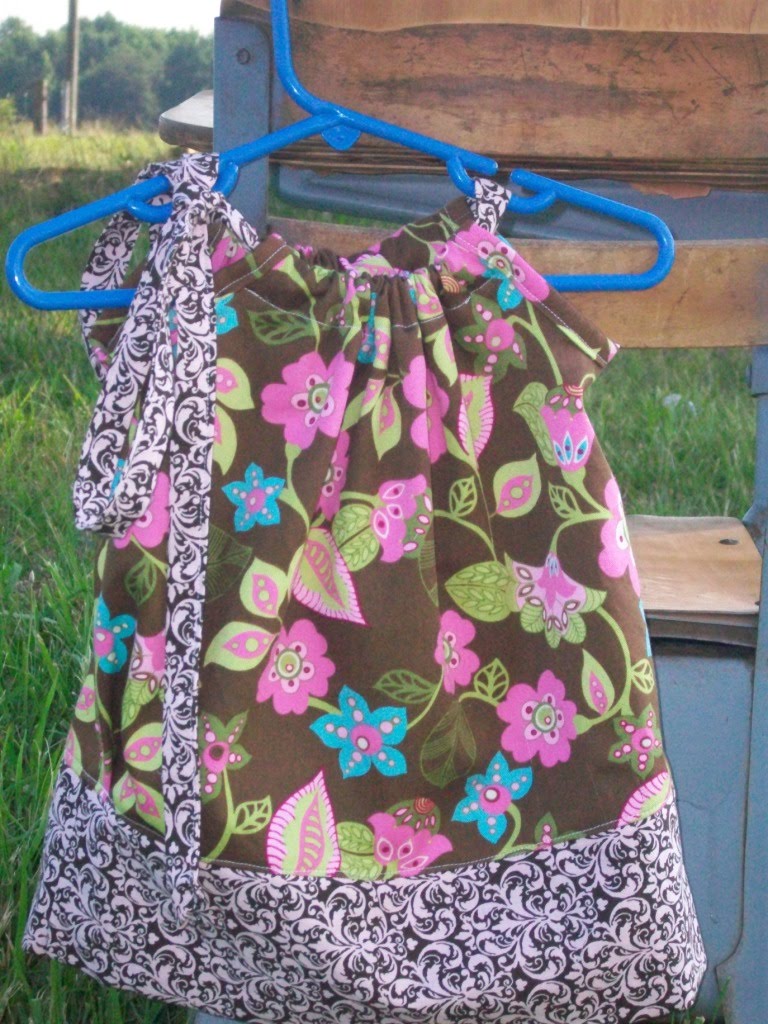
This week has been very productive for me.  I have finished a few projects that I have been working on plus created these two custom dresses for a co-worker's daughter. 


These dresses are quick and easy to make.  I use the Froglegs and Pony Tails pattern for the Caroline Dress.  My favorite part is selecting the fabrics!  I can spend hours upon hours searching for just the right TWO!  I can't wait to see little Clara in these two darling dresses. 

Next week I will be sewing graduation gifts and father day's items.  I am excited to begin sharing more of what I sew!  So check back often to see what I am sewing!

Wednesday, June 2, 2010

The products of my toil!

This is how I sew most of the time.  Yes that is my two year old on my lap...helping!  It can be difficult be we do our best.  Above he is helping me with my clothes pin apron. 


So I began this weekend sewing with a ruffle pouch/clutch tutorial that I had been dying to try out.  It's not quite as ruffly as I wanted but I am going to make a few more today so I will see what I can do. 


This is the above mentioned clothes pin apron...too cute!  I love how handy it is to have my hands free when I am hanging out clothes!


This is Wyatt's quilt top.  The quilt is not finished by any means but the quilt top it done!  YAY!  I only had to cut, sew, rip seams, sew, rip seams again and sew a few 100 times!  I really should have paid more attention to my layout in the beginning but...live and learn!


This is Wyatt's new Cowboy Toy Bag (Hobo bag).  He loves to fill it up with toys and pretend he is traveling.  Please beware if you see a blonde little boy carrying this bag it is probably filled with die cast metal tractors which will result in injury upon impact!


And last but not least is this lovely little number.  A dress for Clara Wren.  But if you like I have enough material left to make another one.
So that concludes my weekend sewing event!  I had lots of fun but have lots more to do.  Don't forget in 2 weeks we will begin the Book sewing...any ideas on a name for this???

Linking up @